Ever wanted to turn your tracks into visual magic? Let’s get into the world of music visualizers and learn how to create them.
What’s a Music Visualizer?
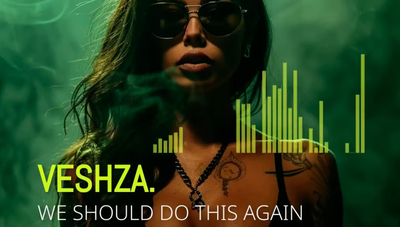
A music visualizer, also known as an audio visualizer, is a video that matches visual elements with your music. Think moving sound waves, pulsing shapes or colours that dance to your beat. They’re perfect for sharing your tracks on social media or adding some flair to your YouTube channel.
Why Use a Music Visualizer?
- Engage your audience: Visuals grab attention and keep viewers watching.
- Promote your music: Share snippets or full tracks in an appealing format.
- Brand yourself: Customize visuals to match your style or album artwork.
- Save money: Skip expensive music video production costs.
Preparing Your Audio File
Before diving into the creation of your music visualizer, it’s crucial to ensure your audio file is in top-notch condition. Here are some essential tips to get your audio file ready:
- Use a Lossless Format: Opt for lossless audio formats like WAV or AIFF to maintain the highest audio quality. These formats preserve the full depth and richness of your sound, ensuring your music visualizer sounds as good as it looks.
- Stereo Sound: Make sure your audio file is in stereo format. Stereo sound provides a more immersive listening experience, which is vital for creating an engaging music visualizer.
- Vocal Isolation: If your track includes vocals, consider using a vocal isolation tool. This can help separate the vocals from the instrumental, allowing your visualizer to highlight the vocals more effectively.
- Trim and Edit: Use audio editing software to trim and edit your audio file to the desired length. This ensures your visualizer is concise and focused.
- Clean Audio: Ensure your audio file is free from background noise or distortion. High audio quality is key to a professional-looking music visualizer.
By preparing your audio file with these tips, you’ll set a solid foundation for creating a stunning music visualizer.
Choosing a Style for Your Music Visualizer
Selecting the right style for your music visualizer is essential to create a visually appealing and engaging video. Here are some tips to help you choose the perfect style:
- Match the Genre: Consider the genre of your music. For instance, an EDM track might benefit from bright colors and fast-paced animations, while a classical piece might look best with elegant, flowing visuals.
- Set the Mood: Think about the atmosphere you want to create. Do you want your visualizer to be relaxing and calming, or energetic and upbeat? Choose a style that reflects the mood of your music.
- Get Inspired: Look at examples of music visualizers online. Take note of the styles that catch your eye and use them as inspiration for your own visualizer.
- Use Templates: To save time and effort, consider using a template or preset style. Many video editing software and online tools, like Beatwave, offer pre-made templates that you can customize to fit your music.
By carefully choosing a style that complements your music, you’ll create a visualizer that not only looks great but also enhances the listening experience.
Making Your Own Music Visualizer
There are two ways to make a music visualizer: using specialized software or online tools. Let’s get into both.
Start by selecting the audio track you want to visualize. This will be the foundation of your visualizer.
Option 1: Using Specialized Software
For techy creators, software like Adobe After Effects or Blender is powerful. But it has a big learning curve and takes time. Once your visualizer is complete, you can export it as a high-quality video file.
Pros:
- Full control
- High quality
- Many effects
Cons:
- Requires technical skills
- Time consuming
- Expensive
Option 2: Online Music Visualizer Tools
For quick and easy results, online tools like Beatwave are the way to go. They’re for musicians, not techies. These tools simplify the video creation process, making it accessible to everyone.
Pros:
- User friendly
- Fast results
- Affordable
- No technical skills needed
Cons:
- Less customization than pro software
- Limited to available templates and effects
Step by Step Guide: Making a Music Visualizer with Beatwave Using an Audio File
- Choose a Template
Choose a template. Pick one that matches your music and brand.
2. Upload Your Track
Upload your MP3 or WAV file into the tool.
3. Customize Your Visualizer
Adjust colours, fonts and effects to match your style. Add your logo or artwork for branding.
4. Choose Your Video Format
Square for Instagram, landscape for YouTube or vertical for TikTok. Consider adding video clips to enhance the visual appeal of your visualizer.
5. Export and Share
Click export, wait a few minutes and download your visualizer.
Tips for Making Music Visualizers
- Match the Mood: Choose visuals that match your music’s vibe.
- Keep It Simple: Don’t overwhelm viewers with too much.
- Brand Consistency: Use colours and fonts that match your artist image.
- Quality Matters: Make sure your audio file is high quality for best results.
- Test on Different Devices: Check how your visualizer looks on phones, tablets and computers.
Adding Text and Graphics to Your Music Visualizer
Enhancing your music visualizer with text and graphics can make it more engaging and visually appealing. Here are some tips to help you add these elements effectively:
- Video Editing Software: Use video editing software like Adobe After Effects or Final Cut Pro to add text and graphics. These programs offer a range of tools to help you create professional-looking visuals.
- Lyrics and Titles: Consider adding lyrics or song titles to your visualizer. This can make your video more interactive and help viewers connect with your music.
- Graphics and Animations: Use shapes, colors, and patterns to enhance the visual appeal of your music visualizer. Experiment with different graphics and animations to find what works best for your video.
- Font Styles: Play around with different font styles and sizes. Choose fonts that match the mood and style of your music to create a cohesive look.
By adding text and graphics thoughtfully, you can elevate your music visualizer and make it stand out.
Rendering and Downloading Your Music Visualizer
Once you’ve created your music visualizer, it’s time to render and download it. Here are some tips to ensure the best quality:
- High-Quality Rendering: Use video editing software that offers high-quality rendering options. Programs like Adobe After Effects and Final Cut Pro can render your visualizer in stunning detail.
- 4K Resolution: Consider rendering your visualizer in 4K resolution. This ensures your video looks sharp and clear on high-definition devices.
- Compatible Formats: Choose a video format that is compatible with your desired platform. For example, MP4 is a widely accepted format for platforms like YouTube.
- Device Compatibility: Download your visualizer in a format that works with your device. If you’re planning to share it on your smartphone, ensure the format is compatible.
By following these tips, you’ll be able to render and download a high-quality music visualizer that looks great on any platform.
Beyond Basic Visualizers: Integrating Video Editing Tools
Once you’ve got the basics down, try these advanced techniques:
- Lyric Visualization: Some tools, like Beatwave, have AI powered lyric syncing.
- Custom Backgrounds: Upload video backgrounds for a unique look. You can also use stock audio to add professional sound effects to your visualizer.
- Teaser Clips: Make short visualizers for upcoming releases.
Uploading Your Music Visualizer to YouTube
Now that your music visualizer is ready, it’s time to share it with the world. Here are some tips for uploading your visualizer to YouTube:
- Create a YouTube Account: If you don’t already have one, create a YouTube account. This will allow you to upload and manage your videos.
- Use the Upload Tool: Use YouTube’s upload tool to upload your music visualizer. This tool lets you add metadata such as titles, descriptions, and tags to help your video get discovered.
- Add Closed Captions: Consider adding closed captions to your visualizer. This makes your video more accessible to viewers who are deaf or hard of hearing.
- Edit if Needed: Use YouTube’s video editing tools to trim and edit your visualizer if necessary. This ensures your video is the correct length and format for the platform.
- Promote on Social Media: Share your music visualizer on social media platforms like Facebook, Twitter, and Instagram to reach a wider audience.
By following these steps, you’ll be able to upload your music visualizer to YouTube and share it with the world.
Sharing Your Music Visualizer
Now you have your visualizer, it’s time to share it:
- YouTube: For full tracks. Use keywords in your title and description. Unlike traditional music videos, visualizers are simpler and focus on enhancing the audio experience.
- Instagram: Share 60 second clips to your feed or longer versions on IGTV.
- TikTok: Use vertical visualizers to grab scrollers attention.
- Facebook: Post to your artist page and share in music groups.
- Twitter: Pin a visualizer to your profile for maximum exposure.
FAQs About Music Visualizers
Q: What audio tracks can I use? A: Most tools accept MP3 and WAV files. Check your chosen platform for details.
Q: Can I use copyrighted images in my visualizer? A: It’s best to use your own artwork or licensed images to avoid copyright issues.
Q: How long does it take to make a visualizer? A: Online tools will have you done in minutes. Pro software will take hours or days.
Q: Do I need technical skills? A: Not with user friendly online tools. They’re for musicians, not techies.
Q: Can I make money from my visualizers? A: Yes! Use them to promote your music and grow your audience. Some creators even offer visualizer services to other musicians.
Final Thoughts
Making a music visualizer doesn’t have to be hard or costly. With Beatwave you can turn your tracks into visual content in a few clicks. Whether you’re promoting a new single or building your brand, visualizers are a must have for any musician.
Remember, the best visualizer is one that complements your music not overpowers it. Start simple, try different styles and most importantly have fun with it. Your perfect visual is just a click away.
Ready to give it a try? Fire up your favorite track and start visualizing!


